
Introduction
In this Tutorial, we learn How to LED Fade | Arduino Tutorial, The Arduino LED Fade project allows you to create a smooth fading effect on an LED using the Arduino UNO board. By manipulating the intensity of the LED gradually, you can achieve a visually appealing transition from dim to bright and vice versa. In this tutorial, we will guide you through the necessary hardware setup and provide a step-by-step explanation of the code implementation.
Hardware Required
To get started with the How to LED Fade | Arduino Tutorial, you will need the following components
| Components | # | Buy From Amazon |
|---|---|---|
| Arduino UNO | 1 | Buy Now |
| LED | 1 | Buy Now |
| Resistor 220Ω | 1 | Buy Now |
| Jumper Wires | 2 | Buy Now |
| Breadboard | 1 | Buy Now |
| 9v DC Adapter (Optional) | 1 | Buy Now |
What is an LED?
LED stands for Light-Emitting Diode, and it is a semiconductor device that emits light when an electric current passes through it. LEDs are commonly used in various applications, such as indicators, displays, and lighting. They come in different colors and can be easily controlled using microcontrollers like Arduino.
Pinout
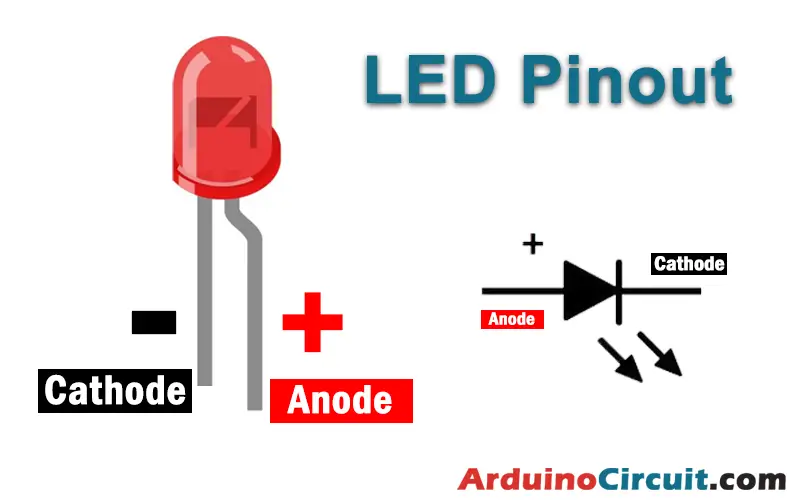
Pin Configuration
| Pin Name | Pin Description |
|---|---|
| ( – ) or Short Pin | Cathode |
| ( + ) or Long Pin | Anode |
Specifications
Before we proceed, let’s explore some specifications of the LED used in this project:
- Operating Voltage: Typically, LEDs operate at low voltages, usually around 2 to 3.3 volts. However, it is important to check the datasheet or product specifications of your specific LED to ensure the correct voltage range.
- Forward Current: The forward current is the amount of current that should flow through the LED to achieve the desired brightness. LEDs have different forward current requirements, usually ranging from 5 to 20 milliamperes (mA).
- Viewing Angle: The viewing angle refers to the angle at which the LED emits light. It determines how wide or narrow the light spread is. Common viewing angles for LEDs range from 90 to 120 degrees.
- Package Type: LEDs come in various package types, such as through-hole and surface mount. In this project, we will be using a standard through-hole LED.
- Color: LEDs are available in a wide range of colors, including red, green, blue, yellow, and more. The color of the LED used in this project can be chosen according to your preference.
Features
Now, let’s explore some key features of LEDs that make them ideal for electronic projects:
- Energy Efficiency: LEDs are highly energy-efficient compared to traditional incandescent bulbs. They consume less power and produce very little heat, making them ideal for battery-powered projects.
- Long Lifespan: LEDs have a significantly longer lifespan compared to traditional bulbs. They can last for thousands of hours, ensuring durability and longevity for your projects.
- Compact Size: LEDs are small and compact, allowing for flexible integration into various projects. Their small size makes them suitable for applications where space is limited.
- Instant On/Off: LEDs illuminate instantly without any warm-up time. They can be turned on and off rapidly, making them perfect for creating dynamic lighting effects.
Circuit Diagram
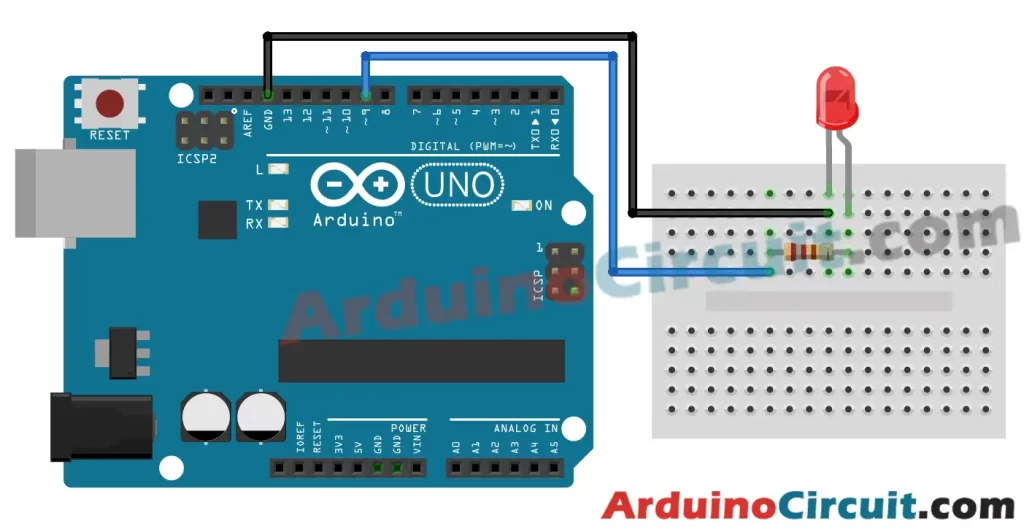
Working Explanation
The LED Fade project works by utilizing the analogWrite() function of the Arduino board. Unlike digital pins that can only output either HIGH or LOW states, the analogWrite() function allows us to simulate analog output by using Pulse Width Modulation (PWM).
PWM works by rapidly switching the output pin between HIGH and LOW states at a specific frequency. By controlling the duration of the HIGH state, we can adjust the average voltage applied to the LED, thus controlling its brightness.
In the LED Fade project, the loop() function uses a for loop to iterate through a range of values from 0 to 255, representing the brightness levels. Each iteration sets the LED brightness using the analogWrite() function and introduces a delay to control the speed of the fading effect. By incrementing the brightness level gradually, we create the smooth fading effect.
Installing Arduino IDE Software
First, you will require to Download the updated version of Arduino IDE Software and Install it on your PC or laptop. if you Learn How to install the Arduino step-by-step guide then click on how to install Arduino Button given Blow
Code
//For more Projects visit at: www.arduinocircuit.com


int led = 9;           // the PWM pin the LED is attached to
int brightness = 0;    // how bright the LED is
int fadeAmount = 5;    // how many points to fade the LED by

// the setup routine runs once when you press reset:
void setup() {
  // declare pin 9 to be an output:
  pinMode(led, OUTPUT);
}

// the loop routine runs over and over again forever:
void loop() {
  // set the brightness of pin 9:
  analogWrite(led, brightness);

  // change the brightness for next time through the loop:
  brightness = brightness + fadeAmount;

  // reverse the direction of the fading at the ends of the fade:
  if (brightness <= 0 || brightness >= 255) {
    fadeAmount = -fadeAmount;
  }
  // wait for 30 milliseconds to see the dimming effect
  delay(30);
}
Code
How to fade-in LED in a period without using delay()
//For more Projects visit at: www.arduinocircuit.com


const int LED_PIN = 9; // the PWM pin the LED is attached to
unsigned long FADE_PEDIOD = 3000; // fade time is 3 seconds

unsigned long fadeStartTime;

// the setup routine runs once when you press reset
void setup() {
  pinMode(LED_PIN, OUTPUT); // declare pin 9 to be an output
  fadeStartTime = millis();
}

// fade-in in loop, and restart after finishing
void loop() {
  unsigned long progress = millis() - fadeStartTime;

  if (progress <= FADE_PEDIOD) {
    long brightness = map(progress, 0, FADE_PEDIOD, 0, 255);
    analogWrite(LED_PIN, brightness);
  }
  else {
    fadeStartTime = millis(); // restart fade again
  }
}
Applications
The LED Fade project has various practical applications. Here are a few examples:
- Mood Lighting: The fading effect can be used to create soothing and relaxing lighting environments, such as in bedrooms, spas, or meditation spaces.
- Ambience Enhancement: By incorporating multiple LEDs with different colors, you can create dynamic lighting effects to enhance the ambience of a room or an event.
- Visual Feedback: The fading effect can serve as a visual feedback mechanism in interactive projects. For example, it can indicate the progress of a task, the level of a sensor reading, or the intensity of sound.
- Decorative Lighting: The fading effect adds an aesthetic touch to decorative lighting setups, such as holiday decorations, architectural lighting, or art installations.
- Simulation and Gaming: The LED fading technique can be used to simulate various effects in gaming or simulation projects, such as the flickering of a candle, the flashing of a warning light, or the pulsating of a heartbeat.
Conclusion
The LED Fade project offers an exciting way to create a smooth fading effect on an LED using Arduino. By manipulating the LED brightness gradually, you can achieve visually appealing transitions. In this tutorial, we discussed the required hardware components, and circuit connections, and provided a detailed explanation of the code implementation. Now you can experiment with different values and speed settings to create unique fading effects. Enjoy exploring the possibilities of Arduino and unleash your creativity!


