Introduction
In this tutorial, we will learn how to control the brightness of an LED with two buttons using an Arduino. The circuit includes two buttons – one for increasing the brightness and the other for decreasing the brightness of the LED. By pressing the appropriate button, we can adjust the brightness of the LED.
Hardware Required
| Components | # | Buy From Amazon |
|---|---|---|
| Arduino UNO | 1 | Buy Now |
| LED 5mm | 1 | Buy Now |
| Buttons | 2 | Buy Now |
| Resistors 220Ω | 1 | Buy Now |
| Resistors 10KΩ | 2 | Buy Now |
| Jumper Wires | Few | Buy Now |
| Breadboard | 1 | Buy Now |
Circuit Connections
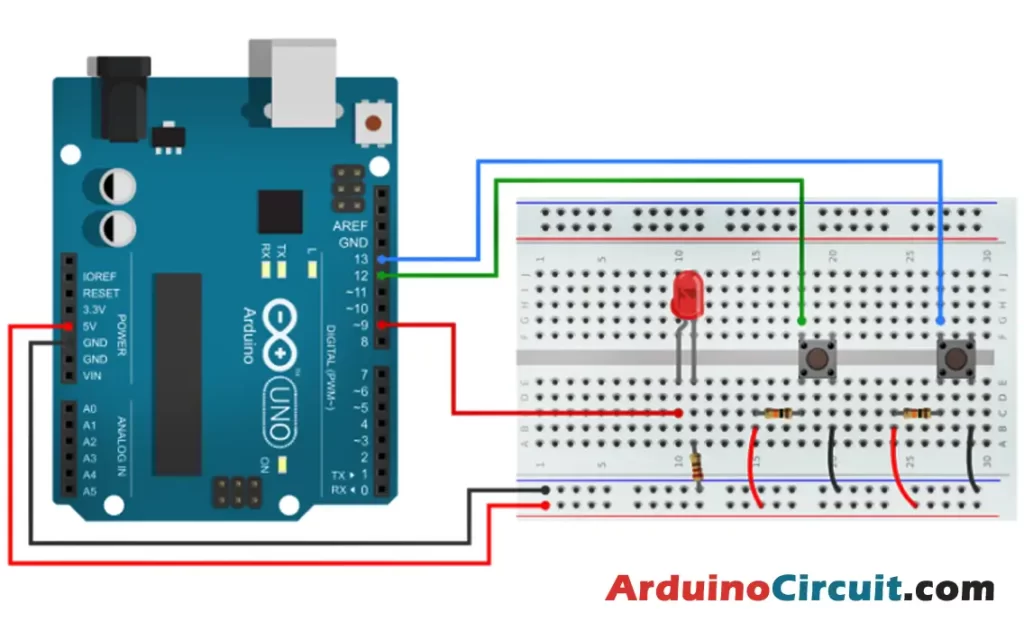
To implement this circuit, we need an Arduino board, two push buttons, an LED, and some connecting wires. We connect the two pushbuttons to the digital pins 12 and 13 of the Arduino board. Then we connect the LED to the digital pin 9 of the Arduino board, with the positive leg connected through a current limiting resistor of 220Ω to the pin and the negative leg to the ground.
Circuit Diagram

Working Explanations
When we press the increase button, the Arduino reads the input from pin 12 and increases the brightness of the LED. Similarly, when we press the decrease button, the Arduino reads the input from pin 13 and decreases the brightness of the LED. The brightness level of the LED is controlled by changing the duty cycle of the PWM signal generated by the Arduino.
Installing Arduino IDE Software
First, you will require to Download the updated version of Arduino IDE Software and Install it on your PC or laptop. if you Learn How to install the Arduino step-by-step guide then click on how to install Arduino Button given Blow
Code
//For more Projects: www.arduinocircuit.com

const int ledPin = 9;
const int buttonPin1 = 12; // Increment Button
const int buttonPin2 = 13; // Decrement Button

int lastState1 = HIGH; // the previous state from the input pin
int lastState2 = HIGH;
int pushCounter = 0;  // counter for the number of button presses
int currentState1, currentState2;     // the current reading from the input pin
int fadeValue = 0;

void setup() {
  pinMode(ledPin, OUTPUT);
  pinMode(buttonPin1, INPUT);
  pinMode(buttonPin2, INPUT);
}

void loop() {
  currentState1 = digitalRead(buttonPin1);
  currentState2 = digitalRead(buttonPin2);
  if (currentState1 != lastState1) {
    if (currentState1 == LOW) {
      pushCounter++;
      fadeValue = pushCounter * 32;
    }
  }
  lastState1 = currentState1;

  if (currentState2 != lastState2) {
    if (currentState2 == LOW) {
      pushCounter--;
      fadeValue = pushCounter * 32;
    }
  }
  lastState2 = currentState2;

  analogWrite(ledPin, fadeValue);

  if (pushCounter >= 8) {
    pushCounter = 0;
  }
  delay(50);
}
Applications
- This circuit can be used in various lighting applications to adjust the brightness of LEDs.
- It can be used in home automation systems to control the brightness of lights.
- It can use in display panels to adjust the brightness of LEDs.
- It can be used in automotive applications to adjust the brightness of indicator LEDs.
- It can be used in medical equipment to adjust the brightness of LEDs.
Conclusion
This project demonstrates how we can use two buttons to control the brightness of an LED using an Arduino. By varying the duty cycle of the PWM signal generated by the Arduino, we can control the brightness of the LED. This circuit can be used in various lighting applications and home automation systems.


