Introduction
Learn How to Control Servo Motor Via Serial Monitor with this step-by-step tutorial. We’ll guide you through the process of connecting an SG90 servo motor to an Arduino Nano and enabling remote control through the Serial Monitor. By sending specific commands via the Serial Monitor, you can control the position of the servo motor. This project offers a simple yet effective way to understand servo motor control and real-time interaction with your Arduino projects.
Hardware Required
You will require the following Hardware Components for interfacing SG90 Servo Motor with Arduino.
| Components | # | Buy From Amazon |
|---|---|---|
| Arduino Nano | 1 | Buy Now |
| SG90 Servo Motor | 1 | Buy Now |
| 9V Battery | 1 | Buy Now |
| Jumper Wires | Few | Buy Now |
| Breadboard | 1 | Buy Now |
What is SG90 Servo Motor?
The SG90 is a micro-sized servo motor known for its compact form factor and accurate rotation control. It operates by receiving a control signal (PWM signal) from a microcontroller, which dictates the desired angle of rotation. The servo motor then moves its shaft to the specified angle with remarkable precision. The SG90 is ideal for applications that require controlled angular movement, such as robotics, remote-controlled vehicles, and camera gimbals.
Pinout
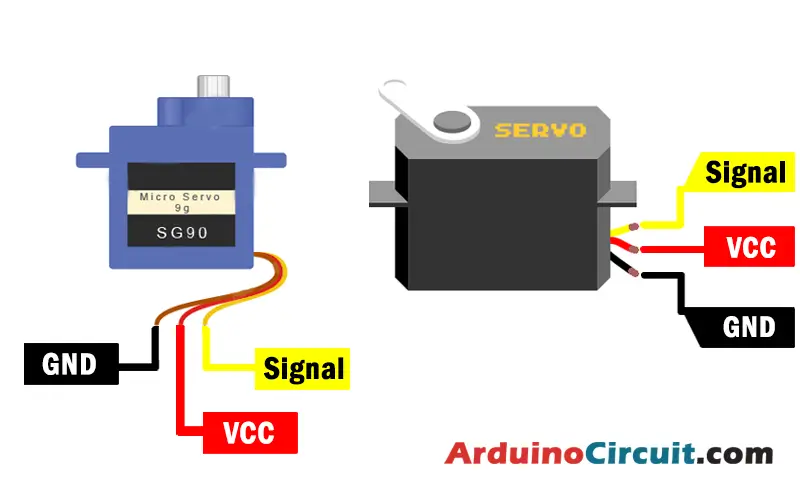
Pin Configuration
| Pin Name | Pin Type |
|---|---|
| VCC | Positive supply Pin |
| GNG | Ground Pin |
| Signal | PWM signal Pin |
Specifications
- Rotation Range: The SG90 servo motor typically has a rotation range of 0 to 180 degrees, providing versatile motion control.
- Operating Voltage: The motor operates within the voltage range compatible with the Arduino Nano and can often be powered by a 9V battery.
- PWM Control: The servo motor is controlled through a PWM signal, allowing precise control over the angle of rotation.
- Compact Size: The small size of the SG90 makes it suitable for projects where space is limited.
Features
- Precision Movement: The SG90 servo motor offers high precision and accuracy in controlling rotational movement.
- Lightweight: The motor’s lightweight design is advantageous in projects where weight considerations are crucial.
- Reversible: The motor can rotate in both clockwise and counterclockwise directions, offering versatility in motion control.
Connection Instructions
Follow these steps to connect the SG90 servo motor to the Arduino Nano:
- Connect the brown wire (GND) of the servo motor to the GND pin on the Arduino Nano.
- Connect the red wire (VCC) of the servo motor to the 5V pin on the Arduino Nano.
- Connect the orange or yellow wire (Signal) of the servo motor to digital pin 9 on the Arduino Nano.
Circuit Diagram
The following circuit shows you How to connect the Servo Motor with Arduino Please make the connection carefully

Circuit Connections
| Arduino | Servo Motor |
|---|---|
| Vin | VCC Pin |
| GND | GND Pin |
| D9 | Sig |
Installing Arduino IDE Software
First, you will require to Download the updated version of Arduino IDE Software and Install it on your PC or laptop. if you Learn How to install the Arduino step-by-step guide then click on how to install Arduino Button given Blow
Code
Use the following Arduino code to control the SG90 servo motor using commands from the Serial Monitor: Type the angle value that we want (0-180) then press enter
//For more Projects: www.arduinocircuit.com

#include <Servo.h>
Servo servo1;
long num;

void setup()
{
servo1.attach(9);
Serial.begin(9600);
Serial.print(“Enter Position = “);
}

void loop()
{
while(Serial.available()>0)
{
num= Serial.parseInt();
Serial.print(num);
Serial.println(” degree”);
Serial.print(“Enter Position = “);
}
servo1.write(num);
delay(15);
}
Explanation
- Connect the components as described in the “Connection Instructions” section.
- Upload the provided Arduino code to your Arduino Nano using the Arduino IDE.
- Open the Serial Monitor in the Arduino IDE (Tools > Serial Monitor).
- Enter a value between 0 and 180 in the Serial Monitor and press Enter. The servo motor will move to the corresponding angle.
Applications
The Controlling Servo Motor using Serial Monitor project has various applications, including:
- Robotic Projects: Control the movement of robotic arms, grippers, or other parts.
- Remote Control: Enable remote control of mechanical components through the Serial Monitor.
- Automation: Integrate servo motors into automated systems for precise positioning.
- Educational Tool: Teach about servo motor operation and real-time interaction with Arduino.
Conclusion
By following this tutorial, you’ve learned how to control an SG90 servo motor using the Serial Monitor and Arduino Nano. We discussed the required components, provided connection instructions, and offered a functional Arduino code for the project. Now you have the knowledge to create your own servo motor control system, allowing you to interact with and control servo motor movements through the Serial Monitor.