Introduction
Introduction
The KY-010 Photo Interrupter module is a switch that will activate a signal when the light beam between the sensor’s gap is intercepted.
This module is capable of interfacing with popular electronic platforms like Arduino, ESP32, Raspberry Pi, and other microcontrollers. that will activate when the sensor is interrupted.
Hardware Required
You will require the following Hardware Components for the Interfacing of the KY-010 Photo Interrupter module with arduino.
| Components | # | Buy From Amazon |
|---|---|---|
| Arduino UNO | 1 | Buy Link |
| KY-010 Photo Interrupter module | 1 | Buy Link |
| Jumper Wires | – | Buy Link |
| Breadboard | 1 | Buy Link |
What is a KY-010 Photo Interrupter module?
A KY-010 Photo Interrupter module is an optical sensor that is used to detect the presence or absence of an object. It consists of an infrared LED and a phototransistor that are positioned opposite each other in a small package. The LED emits infrared light and the phototransistor detects this light. When an object passes between the LED and the phototransistor, the light is blocked, and the phototransistor’s output changes, indicating that an object has been detected.

Specifications
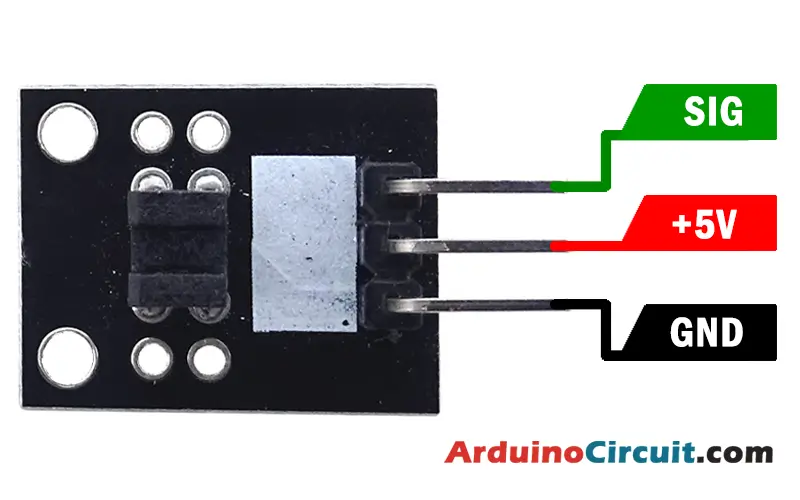
This module contains 3 male header pins and an optical emitter/detector on the front side. and on the back side a 1kΩ resistor and 33Ω resistor.
The sensor uses a ray of light between the emitter and detector to scan if the way between both is existing intercepted by an opaque object.
| Operating Voltage | 3.3V ~ 5V |
| Board Dimensions | 18.5mm x 15mm [0.728in x 0.591in] |
Pinout

Pin Configuration
| Pin Name | Pin Type |
|---|---|
| S (right) | Signal Pin |
| middle Pin | Vcc (+5) |
| – (left) | Ground |
Circuit Diagram
The following circuit shows you the connection of the KY-010 Photo Interrupter module with Arduino Please make the connection carefully

Circuit Connections
Place the module on the BreadBoard then connect the ground (left) pin and power line (middle) pin of the module to the GND pin and +5V pin of the arduino and the signal (S) of the module to pin 3 of the arduino respectively.
| Arduino | Module |
|---|---|
| Pin 3 | S (right) |
| +5v | Middle |
| GND | – (left) |
Installing Arduino IDE Software
First, you will require to Download the updated version of Arduino IDE Software and Install it on your PC or laptop. if you Learn How to install the Arduino step-by-step guide then click on how to install Arduino Button given Blow
Code
The following arduino code will turn on the LED placed on the (pin 13) of the Arduino when there is an object intercepting the path between the sensor’s hole.
int Led = 13; // define LED pin
int buttonpin = 3; // define photo interrupter signal pin
int val; //define a numeric variable
void setup()
{
	pinMode(Led, OUTPUT); // LED pin as output
	pinMode(buttonpin, INPUT); //photo interrupter pin as input
}
void loop()
{
	val=digitalRead(buttonpin); //read the value of the sensor
	if(val == HIGH) // turn on LED when sensor is blocked
	{
		digitalWrite(Led,HIGH);
	}
	else
	{
		digitalWrite(Led,LOW);
	}
}
Applications
Applications of the KY-010 Photo Interrupter module include:
- Object detection: The KY-010 Photo Interrupter can be used to detect the presence of an object in a certain area, such as a conveyor belt or a printing press.
- Counting objects: By using multiple KY-010 Photo Interrupters in a row, it is possible to count the number of objects that pass through a particular area.
- Speed measurement: By measuring the time it takes for an object to pass through a KY-010 Photo Interrupter, the speed of the object can be determined.
- Position detection: By measuring the position of an object with respect to the KY-010 Photo Interrupter, the position of the object can be determined.
- Optical switching: The KY-010 Photo Interrupter can be used as a switch, with the LED and phototransistor being connected in a switch configuration. When an object is present, the switch is closed, and when it is absent, the switch is open.
Downloads Files
- The KY-010 Photo Interrupter module Fritzing Part:
- Optical emitter/detector Datasheet:


