
Introduction
Send Email through Arduino and a Web interface, With the combination of an Arduino UNO, Arduino Ethernet Shield 2, and a Gmail account, you can set up a system that allows you to send emails directly from your Arduino board. This tutorial will guide you through the process of establishing an internet connection using the Ethernet Shield, configuring the necessary libraries, and creating a web interface to send emails.
Hardware Required
To send emails through Arduino and a web interface, you will need the following components
| Components | # | Buy From Amazon |
|---|---|---|
| Arduino UNO | 1 | Buy Now |
| Arduino Ethernet Shield 2 | 1 | Buy Now |
| Ethernet Cable | 1 | Buy Now |
| Gmail account | 1 | Account |
| Jumper Wires | Few | Buy Now |
| Breadboard | 1 | Buy Now |
Circuit Setup
- Connect the Ethernet Shield to the Arduino UNO by plugging it onto the Arduino board.
- Connect one end of the Ethernet cable to the Ethernet Shield and the other end to your router or network switch.
Setting Up the Ethernet Shield
- Install the Ethernet library: Open the Arduino IDE and navigate to Sketch -> Include Library -> Manage Libraries. Search for “Ethernet” and install the library developed by the Arduino team.
- Configure the IP address: In your Arduino sketch, assign a unique IP address to your Arduino board using the Ethernet library. This IP address should be compatible with your network configuration.
Circuit Diagram
Here LED and resistor is used but you may not use its just an indication.

Creating a Web Interface
- Set up the necessary libraries: Install the necessary libraries for sending emails using Arduino. These may include libraries such as “SPI” and “EthernetSMTP.”
- Create an HTML form: Create an HTML form that includes input fields for the recipient’s email address, subject, and message. This form will be used to gather the necessary information for sending the email.
- Set up the Arduino code: Write the Arduino code to handle the web interface requests. This code should include a web server that listens for incoming requests and processes the email data.
- Extract from data: Extract the recipient’s email address, subject, and message from the incoming request and store them in variables.
- Send the email: Use the Gmail SMTP server and appropriate authentication credentials to establish a connection and send the email. This can be achieved by utilizing the “EthernetSMTP” library and providing your Gmail account details.
Gmail account configuration
On the account management page, go to the “Security” tab, then look for the “Sign in to Google” box.
Add two-step validation.
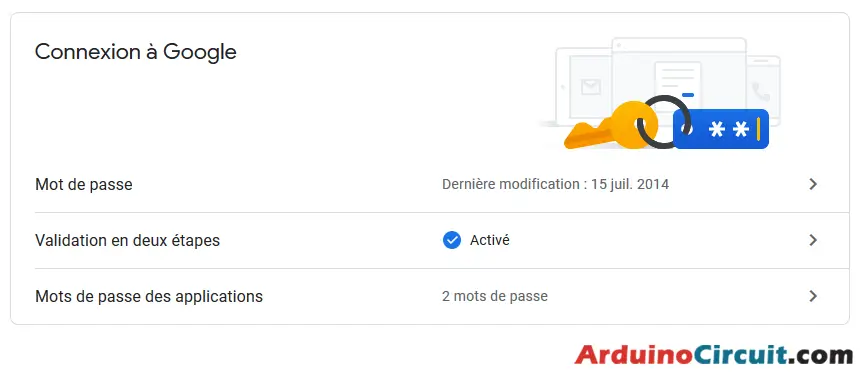
Generate an account access password for a given application

You just have to copy in the JavaScript code below, the user ID (the Gmail address) and the password issued by Google (yellow insert above).
JavaScript code to send an email
The code that will allow us to send emails is the JavaScript code present in the HTML code of the web interface. Before creating the mail-sending function, we will import the smtp.js library
<script src='https://smtpjs.com/v3/smtp.js'></script>Now we are adding the definition of the sendEmail function.
 <script>
  function sendEmail() {
  Email.send({
    Host: 'smtp.gmail.com',
    Username : '*************@gmail.com',
    Password : '**********************',
    To : 'destinataire@gmail.com',
    From : 'emetteur@aranacorp.com',
    Subject : 'Data from "+nom+"',
    Body : 'The sensor value is : "+String(analogRead(A0))+"',
    }).then(
      message => alert('mail sent successfully')
    );
  }
  </script>
Installing Arduino IDE Software
First, you will require to Download the updated version of Arduino IDE Software and Install it on your PC or laptop. if you Learn How to install the Arduino step-by-step guide then click on how to install Arduino Button given Blow
Installing Libraries
Now when you are Ready to upload the code, to the Arduino Board you will need first to add the Following Libraries in Arduino, If you Learn How to add the library in the Arduino step-by-step guide click on how to install the library Button given Blow
//For more Projects: www.arduinocircuit.com
//Libraries
#include Ethernet.h>
String request ;
String nom = "Arduino";
unsigned long refreshCounter  = 0;
IPAddress ip(192, 168, 1, 179) ;
byte mac [6] = {0x54, 0x34, 0x41, 0x30, 0x30, 0x31};
//Objects
EthernetServer server(80);
EthernetClient client;
void setup() {
  //Init Serial USB
  Serial.begin(9600);
  Serial.println(F("Initialize System"));
  //Init W5100
  Ethernet.begin(mac, ip);
  while (!Ethernet.begin(mac)) {
    Serial.println(F("failed. Retrying in 1 seconds."));
    delay(1000);
    Serial.print(F("Starting W5100..."));
  }
  pinMode(2, OUTPUT);
  server.begin();
  Serial.println(F("W5100 initialized"));
  Serial.print(F("IP Address: "));
  Serial.println(Ethernet.localIP());
}
void loop() {
  client = server.available();
  clientRequest();
  handleRequest();
}
void clientRequest( ) { /* function clientRequest */
  ////Get client request
  if (!client) {
    return;
  }
  // Wait until the client sends some data
  while (!client.available()) {
    delay(1);
  }
  request = client.readStringUntil('\r'); // Read the first line of the request
  Serial.println(request);
  client.flush();
}
void handleRequest( ) { /* function handleRequest */
  ////Handle web client request
  if (request.indexOf("/dig2on") > 0) {
    digitalWrite(2, HIGH);
  }
  if (request.indexOf("/dig2off") > 0) {
    digitalWrite(2, LOW);
  }
  if (request.indexOf("GET") >= 0) {
    webpage(client);
    client.stop();
  }
}
void webpage(EthernetClient client) { /* function webpage */
  ////Send wbepage to client
  client.println("HTTP/1.1 200 OK");
  client.println("Content-Type: text/html");
  client.println(""); //  do not forget this one
  client.println("");
  client.println("");
  client.println("");
  client.println("");
  client.println("");
  client.println("");
  client.println("");
  client.println("function sendEmail() {");
  client.println("Email.send({");
  client.println("  Host: 'smtp.gmail.com',");
  client.println("  Username : '*************@gmail.com',");
  client.println("  Password : '**********************',");
  client.println("  To : 'destinataire@gmail.com',");
  client.println("  From : 'emetteur@aranacorp.com',");
  client.println("  Subject : 'Data from Arduino" + nom + "',");
  client.println("  Body : 'The sensor value is : " + String(analogRead(A0)) + "',");
  client.println("  }).then(");
  client.println("    message => alert('mail sent successfully')");
  client.println("  );");
  client.println("}");
  client.println("");
  client.println("");
  client.println("");
  client.println("");
  client.println(" " + nom + " Device Control ");
  client.println("");
  client.println("");
  client.println("");
  client.println("");
  client.println("  Pin A0");
  client.println("   + String(analogRead(A0)) + " readonly>");
  client.println("  ");
  client.println("");
  client.println("Send email");
  client.println("");
  client.println("");
  client.println("");
  client.println("");
  client.println("www.aranacorp.com");
  client.println("");
  client.println("");
  client.println("");
  client.println();
  delay(1);
}
Testing the System
- Upload the code to the Arduino: Upload the Arduino code to your Arduino UNO using the Arduino IDE.
- Access the web interface: Connect your Arduino board to power and your local network. Open a web browser and enter the assigned IP address of the Arduino board in the address bar.
- Fill in the email details: Fill in the recipient’s email address, subject, and message in the web interface form.
- Send the email: Submit the form, and the Arduino will process the data and send the email using the configured Gmail account.
Conclusion
By combining the power of Arduino, the Arduino Ethernet Shield 2, and a Gmail account, you can create a system that allows you to send emails directly from your Arduino board. This opens up possibilities for remote notifications, alerts, and automation applications. With the provided guidelines, you can set up the necessary hardware connections, configure the software, and create a web interface to send emails seamlessly. Explore the capabilities of this system and adapt it to your specific requirements for enhanced communication and control.


