Introduction
In this tutorial, we are going to Interfacing ML8511 UV Sensor Module with Arduino, The ML8511 UV Sensor Module offers a practical solution to measure UV levels and safeguard against potential risks. In this comprehensive guide, we will explore the working principle and applications of the ML8511 UV Sensor Module. Moreover, we will learn how to interface it with an Arduino UNO to create a UV monitoring system. By the end of this tutorial, you will have the knowledge and skills to incorporate UV sensing capabilities into your projects, enhancing safety and awareness. So, let’s embark on this enlightening journey and uncover the world of UV radiation detection!
Hardware Required
You will require the following Hardware Components for Interfacing ML8511 UV Sensor Module with Arduino.
| Components | # | Buy From Amazon |
|---|---|---|
| Arduino UNO | 1 | Buy Now |
| ML8511 UV Detection Module | 1 | Buy Now |
| 9v DC Adapter (Optional) | 1 | Buy Now |
| Jumper Wires | 5 | Buy Now |
| Breadboard | 1 | Buy Now |
What is ML8511 UV Detection Module?
The ML8511 UV Sensor Module is a compact and highly sensitive sensor that can detect ultraviolet radiation in the UVA (315-400nm) range. It operates on the principles of the photodiode effect, where UV radiation striking the sensor’s surface generates a current proportional to the incident UV intensity. The module includes analog voltage output and supports both 3.3V and 5V power supply options, making it versatile for various microcontroller platforms like Arduino UNO.
Pinout

Pin Configuration
| Pin Name | Pin Type |
|---|---|
| EN | Enable Sensor (It is Active High. For enabling the sensor, it must be connected to VCC) |
| OUT | Analog output |
| GND | Ground |
| VCC | Module power supply – 3.3V |
Specifications
- UV Detection Range: The ML8511 module is designed to detect UVA radiation in the range of 280 to 390nm, which is crucial for assessing potential health risks from UV exposure.
- Sensitivity: It offers high sensitivity, allowing for accurate UV level measurements even in low-intensity UV environments.
- Output Voltage Range: The analog output voltage of the module varies proportionally with the UV intensity, providing a voltage range suitable for ADC (Analog-to-Digital Converter) readings on the Arduino.
- Power Supply: The ML8511 supports both 3.3V and 5V power supply options, making it compatible with a wide range of microcontrollers.
- Compact Form Factor: The small size of the module allows for easy integration into various projects.
Features
- Non-Contact Sensing: The sensor provides non-contact UV detection, ensuring no direct exposure to harmful UV rays during measurements.
- Wide Application Scope: The ML8511 UV Sensor Module is ideal for applications in UV index monitoring, UV radiation measurement, and UV-related safety systems.
- Low Power Consumption: The module operates with low power consumption, making it suitable for battery-powered projects and long-term monitoring applications.
Circuit Diagram
The following circuit shows you the connection of the Interfacing ML8511 UV Sensor Module with Arduino Please make the connection carefully
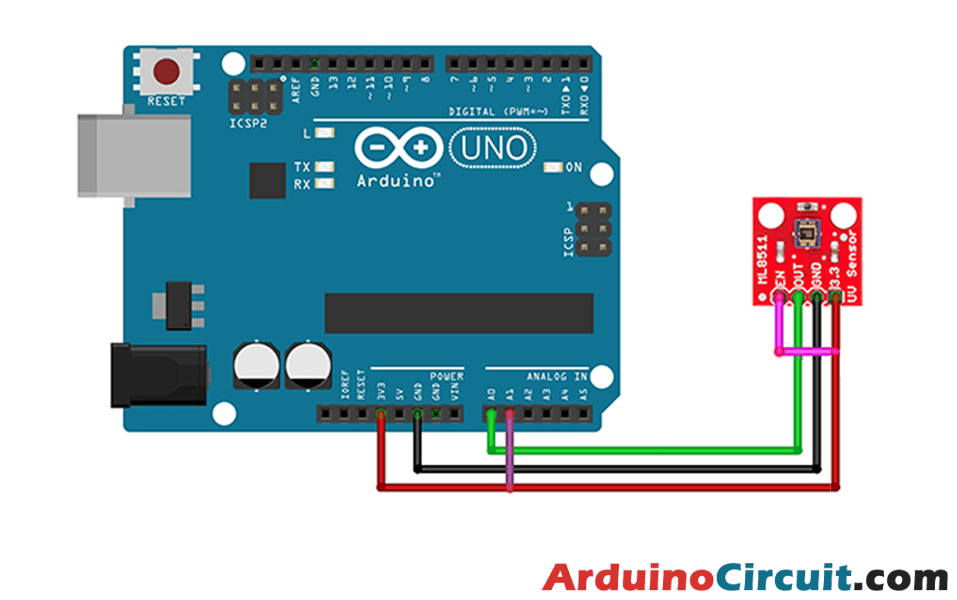
Circuit Connections
| Arduino | Module |
|---|---|
| +5V | +V Pin |
| GND | GND Pin |
| A0 | A0 |
| D0 | D0 |
Installing Arduino IDE Software
First, you will require to Download the updated version of Arduino IDE Software and Install it on your PC or laptop. if you Learn How to install the Arduino step-by-step guide then click on how to install Arduino Button given Blow
Code
//For more Projects: www.arduinocircuit.com

//pin definitions
int UV_OUT = A0;    //Sensor Output
int REF_3V3 = A1;   //3.3V power on the Arduino board

void setup()
{
  Serial.begin(9600);
  Serial.println("ML8511 example");
}

void loop()
{
  int uv_Level = analogRead_average(UV_OUT);
  int ref_Level = analogRead_average(REF_3V3);

  //Use the 3.3V power pin as a reference to get a very accurate output value from sensor
  float output_Voltage = 3.3 / ref_Level * uv_Level;

  float uvIntensity = mapfloat(output_Voltage, 0.99, 2.8, 0.0, 15.0); //Convert the voltage to a UV intensity level -numbers from datasheet-

  Serial.print("ML8511 output: ");
  Serial.print(uv_Level);

  Serial.print(" / ML8511 voltage: ");
  Serial.print(output_Voltage);

  Serial.print(" / UV Intensity (mW/cm^2): ");
  Serial.print(uvIntensity);

  Serial.println();

  delay(500);
}

//Takes an average of readings on a given pin
//Returns the average
int analogRead_average(int pinToRead)
{
  int NumberOfSamples = 8;
  int runningValue = 0;

  for(int x = 0; x < NumberOfSamples; x++)
    runningValue += analogRead(pinToRead);
  runningValue /= NumberOfSamples;

  return(runningValue);
}

//The Arduino Map function but for floats
//From: http://forum.arduino.cc/index.php?topic=3922.0
float mapfloat(float x, float in_min, float in_max, float out_min, float out_max)
{
  return (x - in_min) * (out_max - out_min) / (in_max - in_min) + out_min;
}
In this code, we utilize the Arduino A0 pin to capture the analog output data. Additionally, we establish a connection between the A1 pin and the 3.3V power supply, utilizing it as a reference to ensure precise measurement of the output voltage. By measuring the output voltage, we can accurately calculate the intensity of the ultraviolet light in milliwatts per square centimeter (mW/cm²).
Furthermore, to observe the sensor’s functionality, we turn on the flashlight of a mobile phone and bring it near the sensor.
Output Result.
The output results are as follows.

Applications
- UV Index Monitoring: The sensor can be utilized in weather stations or wearable devices to monitor UV index levels, providing timely sun protection recommendations.
- UV Radiation Measurement: In research and scientific applications, the ML8511 module can be used to measure UV radiation levels for studying environmental effects and health implications.
- Personal Safety Devices: Integrating the sensor into personal safety devices, such as wristbands or hats, can alert users when UV exposure reaches potentially harmful levels.
- Garden and Agriculture: The module can be employed in agricultural systems to monitor UV levels, assisting in optimizing plant growth conditions and preventing crop damage.
- UV Sterilization Systems: In UV sterilization applications, the sensor can aid in maintaining the optimal UV dosage for effective disinfection.
Conclusion
you can create a UV monitoring system to ensure safety and raise awareness about UV radiation exposure. From weather monitoring to UV sterilization, the ML8511 module brings valuable UV sensing capabilities to your projects. Armed with this knowledge, you can now incorporate UV detection into various applications, promoting health and well-being. So, utilize the power of UV radiation detection with the ML8511 UV Sensor Module and embark on projects that make a positive impact on personal safety and environmental awareness. Happy exploring!